ODS.OdsAddressbookGettingStarted
ODS Addressbook Getting Started
Prerequisites
- Virtuoso Server has been installed and is running
- ODS and other ODS Applications including Addressbook have been successfully installed
- Register a new ODS account or login using your Virtuoso installers 'dba' or 'dav' accounts.
Step By Guide
- Using a web browser, login into you ODS user account or login as DAV or DBA by typing the following URL into your web browser: http://localhost:8890/ods/
- Select the Addressbook tab from the ODS Bar.
- Select the "Create New" Link.
- Enter your Addressbook name, URL and click the button labeled "Create and Launch Application", which will create a new Addressbook instance.
Create contacts
Once you have created an instance, you are ready to create, edit, delete, view, share, import, export contact(s).
- Click "New contact" from the Addressbook Main Navigation Bar.
- You can enter the information in the 4 offered tabs: Personal, Contact, Home and Business
- You can add tag(s) either entering them manually, or to use the "Suggest" feature. Another option is to choose a tag from your own tags, shown in the list "My tags".
- You can add contact(s) also from your BRiewfcase instance, when uploading a FOAF/RDF file to your DAV user folder.
Share contact(s)
Once you have created contact(s) in your Addressbook, you can share them to other registered in the ODS dataspace users:
- Click "My Contacts" from the Addressbook Main Navigation Bar.
- As result in the 2nd pane will be shown the list of your own contact(s). Check the check-boxes for those contact you want to share and click the "Sharing" icon from the Addressbook Main NAvigation Bar
- Enter the list (or choose users from the "Select" button next to User(s)) of users you want to share the contacts to. Additionally you may want to override the current sharings.
Import contact(s)
Another way of adding contact(s) to your Addressbook to import them from files with several types supported:
- Click "Import" from the Addressbook Main Navigation Bar
- You can import from your local filesystem, from WebDAV or from defined in your user profile page-> tab LDAP Servers a valid LDAP Server
- You can import from vCard, FOAF/RDF and CVS files
- For CVS files when importing, you will be offered a manual mapping to the values you would like to be imported.
Export contact(s)
ODS-Addressbook offers the feature to export contact(s):
- Click "Export" from the Addressbook Main Navigation Bar
- You may wish to export in vCard, CSV or FOAF format.
- Enter the filename value and click "Export".
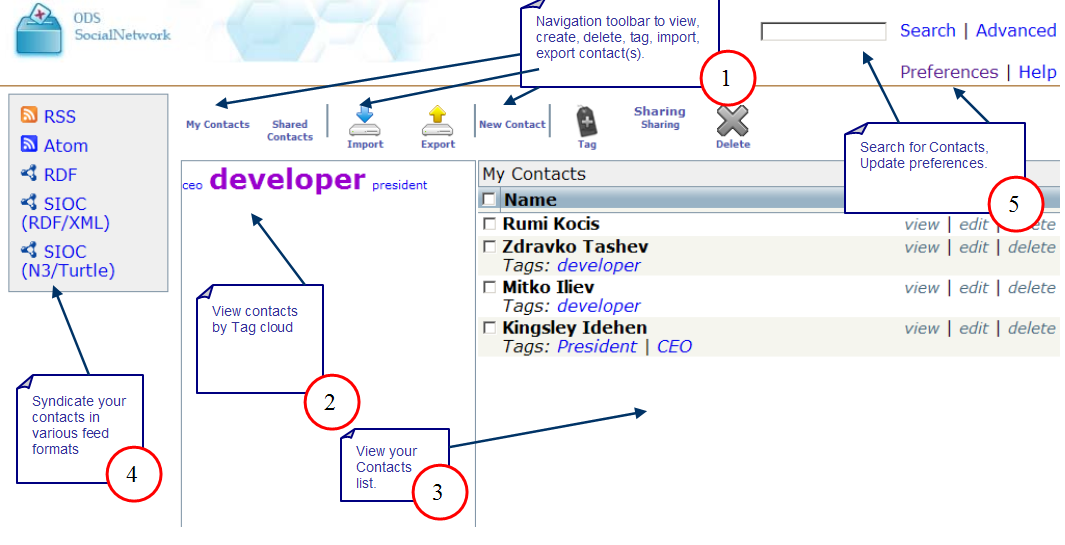
Addressbook Page Overview
Check out some of Addressbook other features as show below:
- Use the Navigation Toolbar to manage your contacts.
- View Contacts by Tag cloud.
- View your contacts list
- Syndicate your contacts in various feed formats
- Search for Contacts ( Simple and Advanced search) and manage your Addressbook preferences.
Figure 1 - Addressbook

